


Get that smoky, charred finish without ever firing up the grill! Whether you’re hanging out with friends, or planning a full backyard get-together, these family-style Beer Brats are easy, flavorful, perfectly seared in a cast iron for even cooking every time. No complicated setup, no BBQ required - just simple, delicious brats!
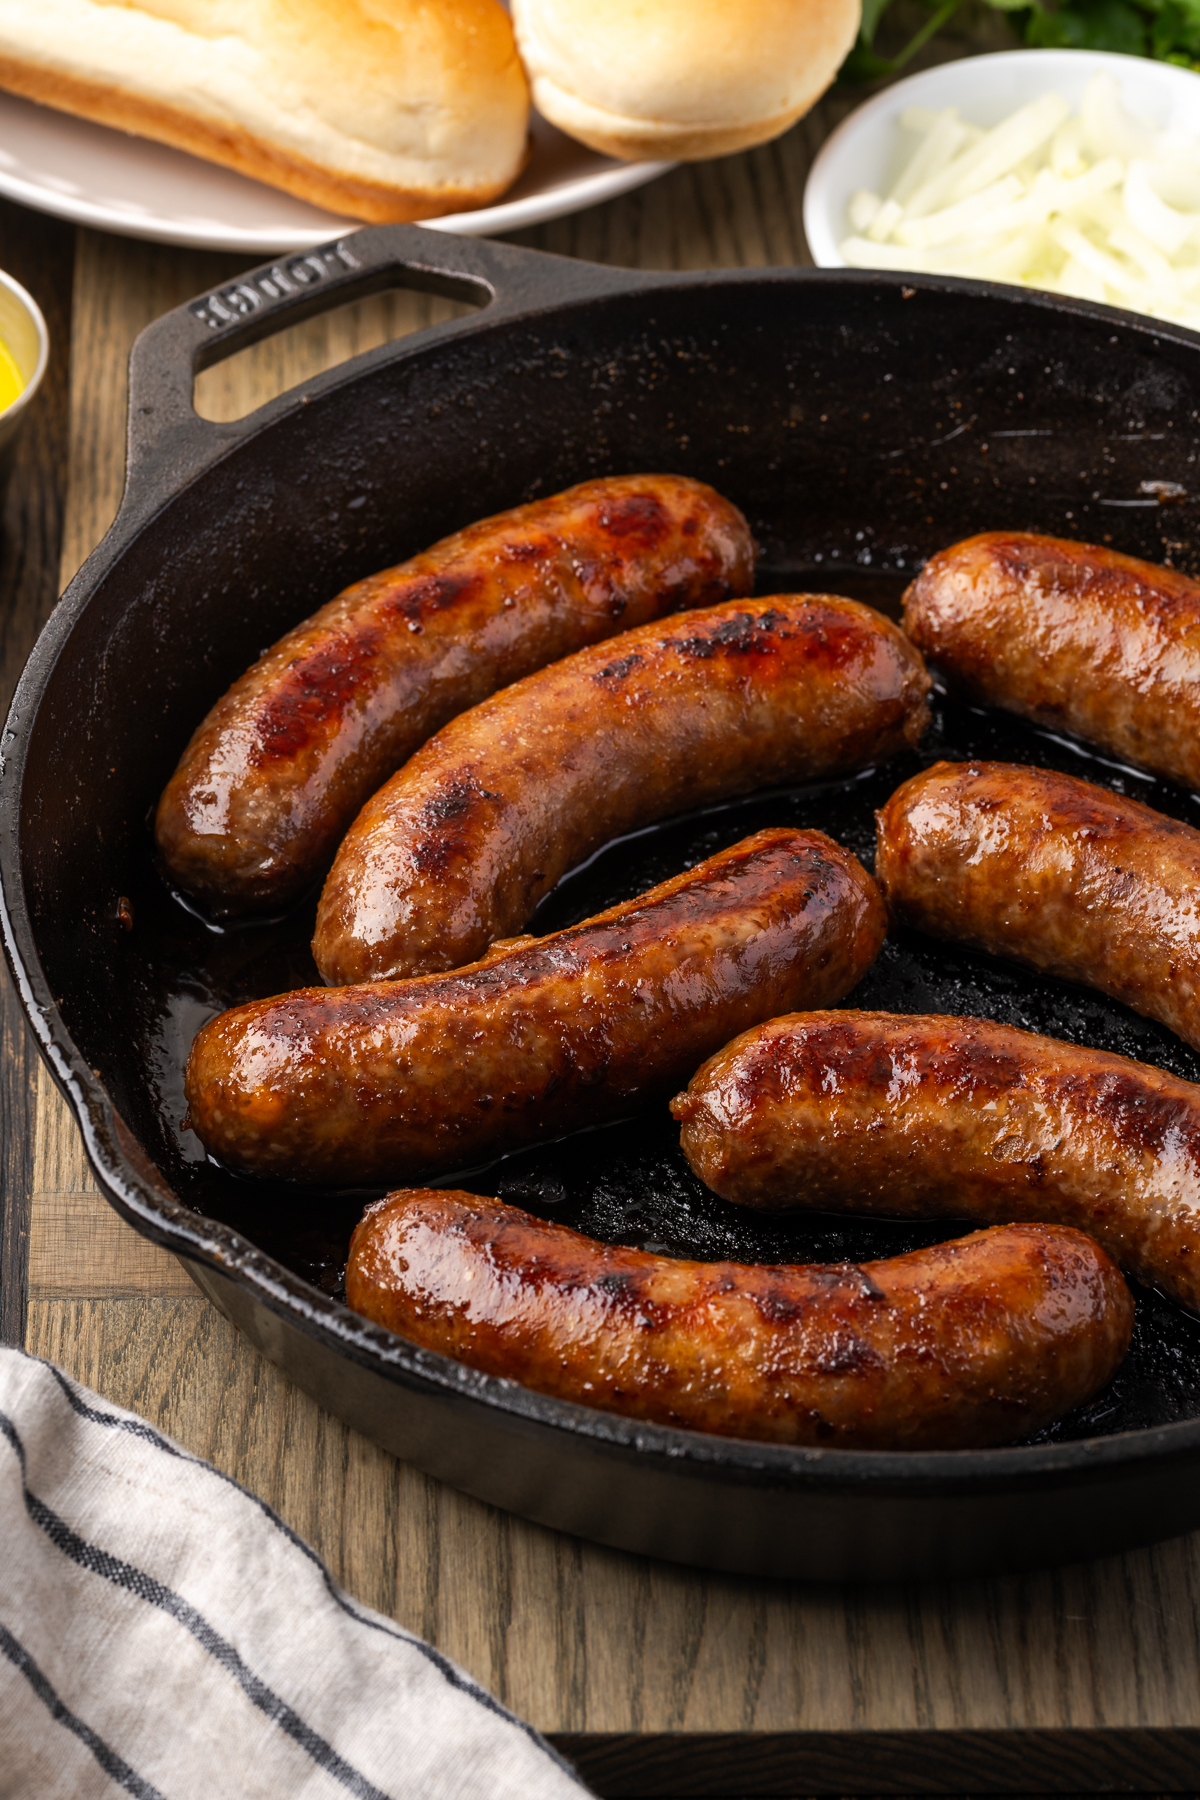
Beer Brats are a classic for good reason—and nothing beats a juicy brat simmered in beer and finished in a sizzling-hot cast iron skillet. Best of all, this method is easy and foolproof for retaining moisture, while giving them a crisp, golden-brown sear.
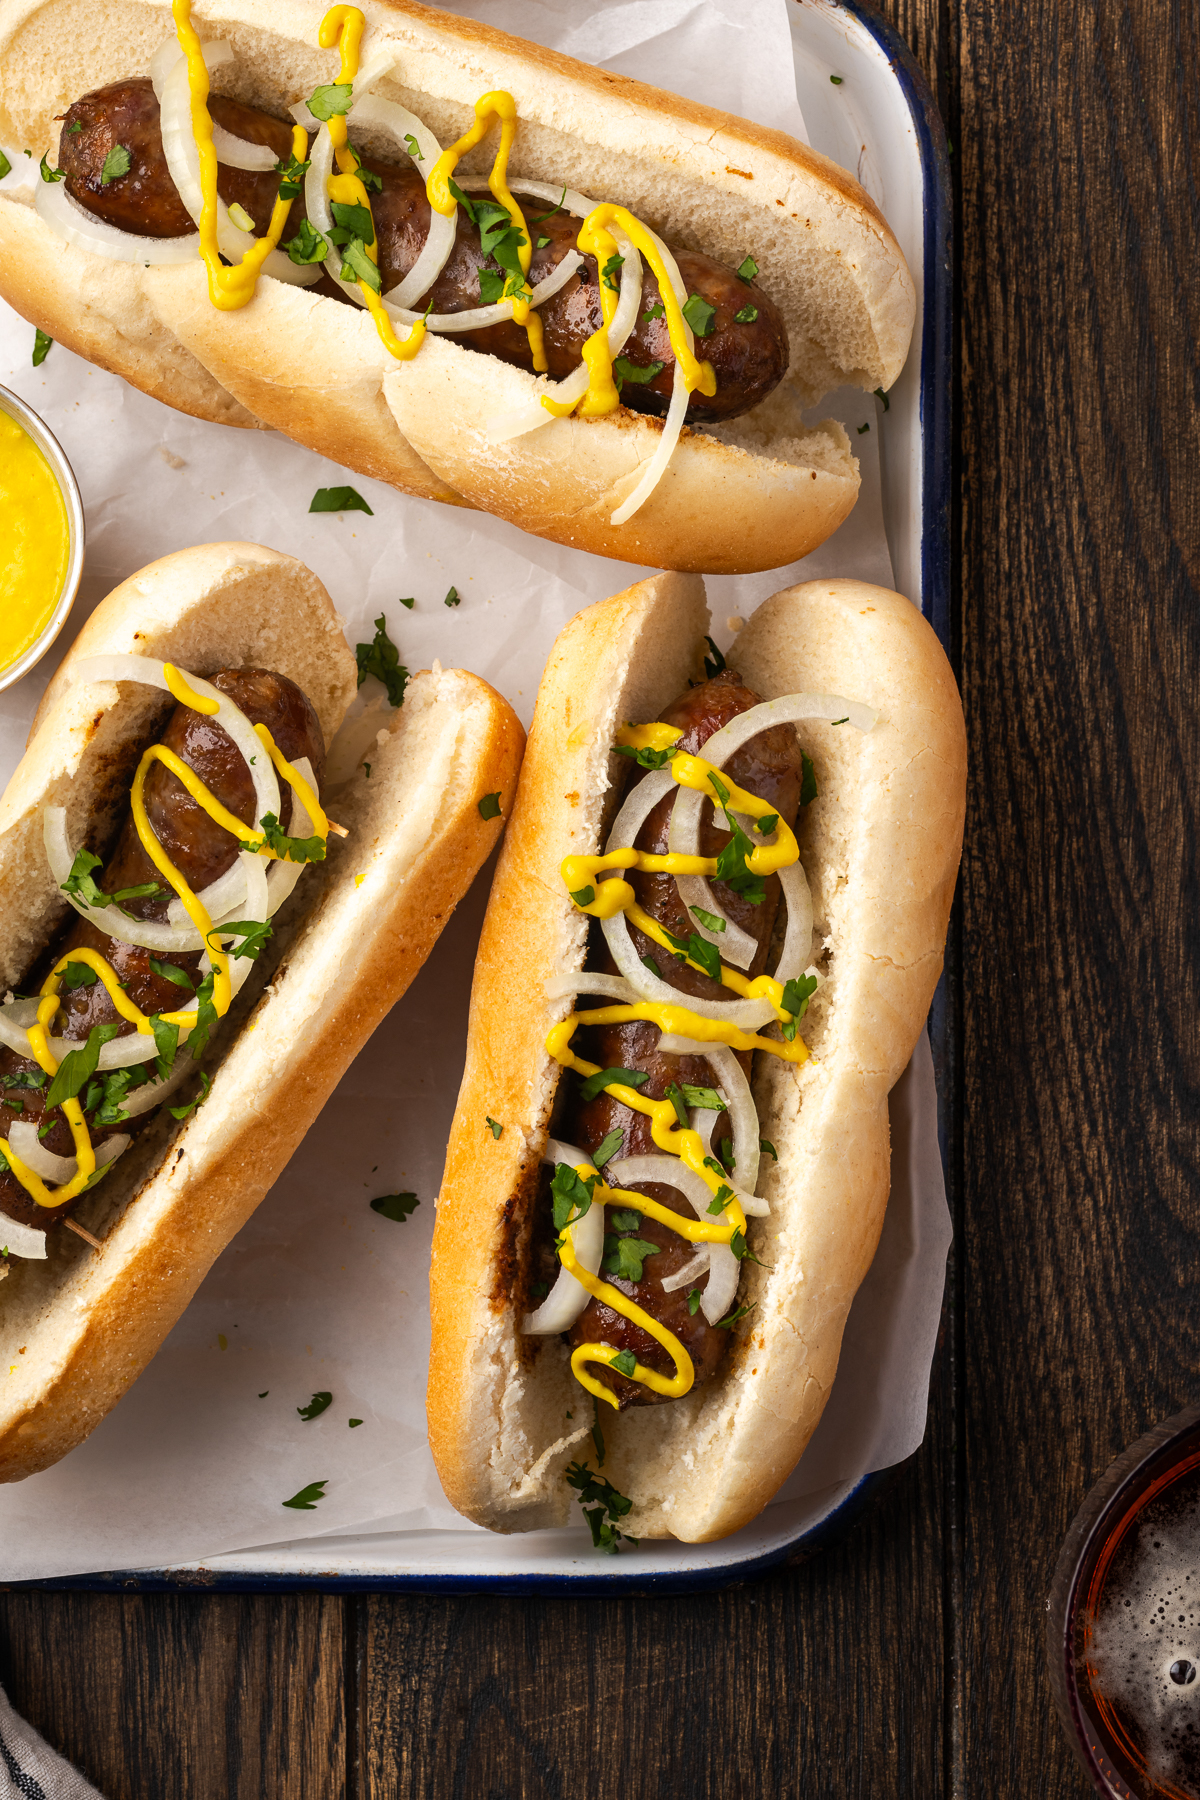
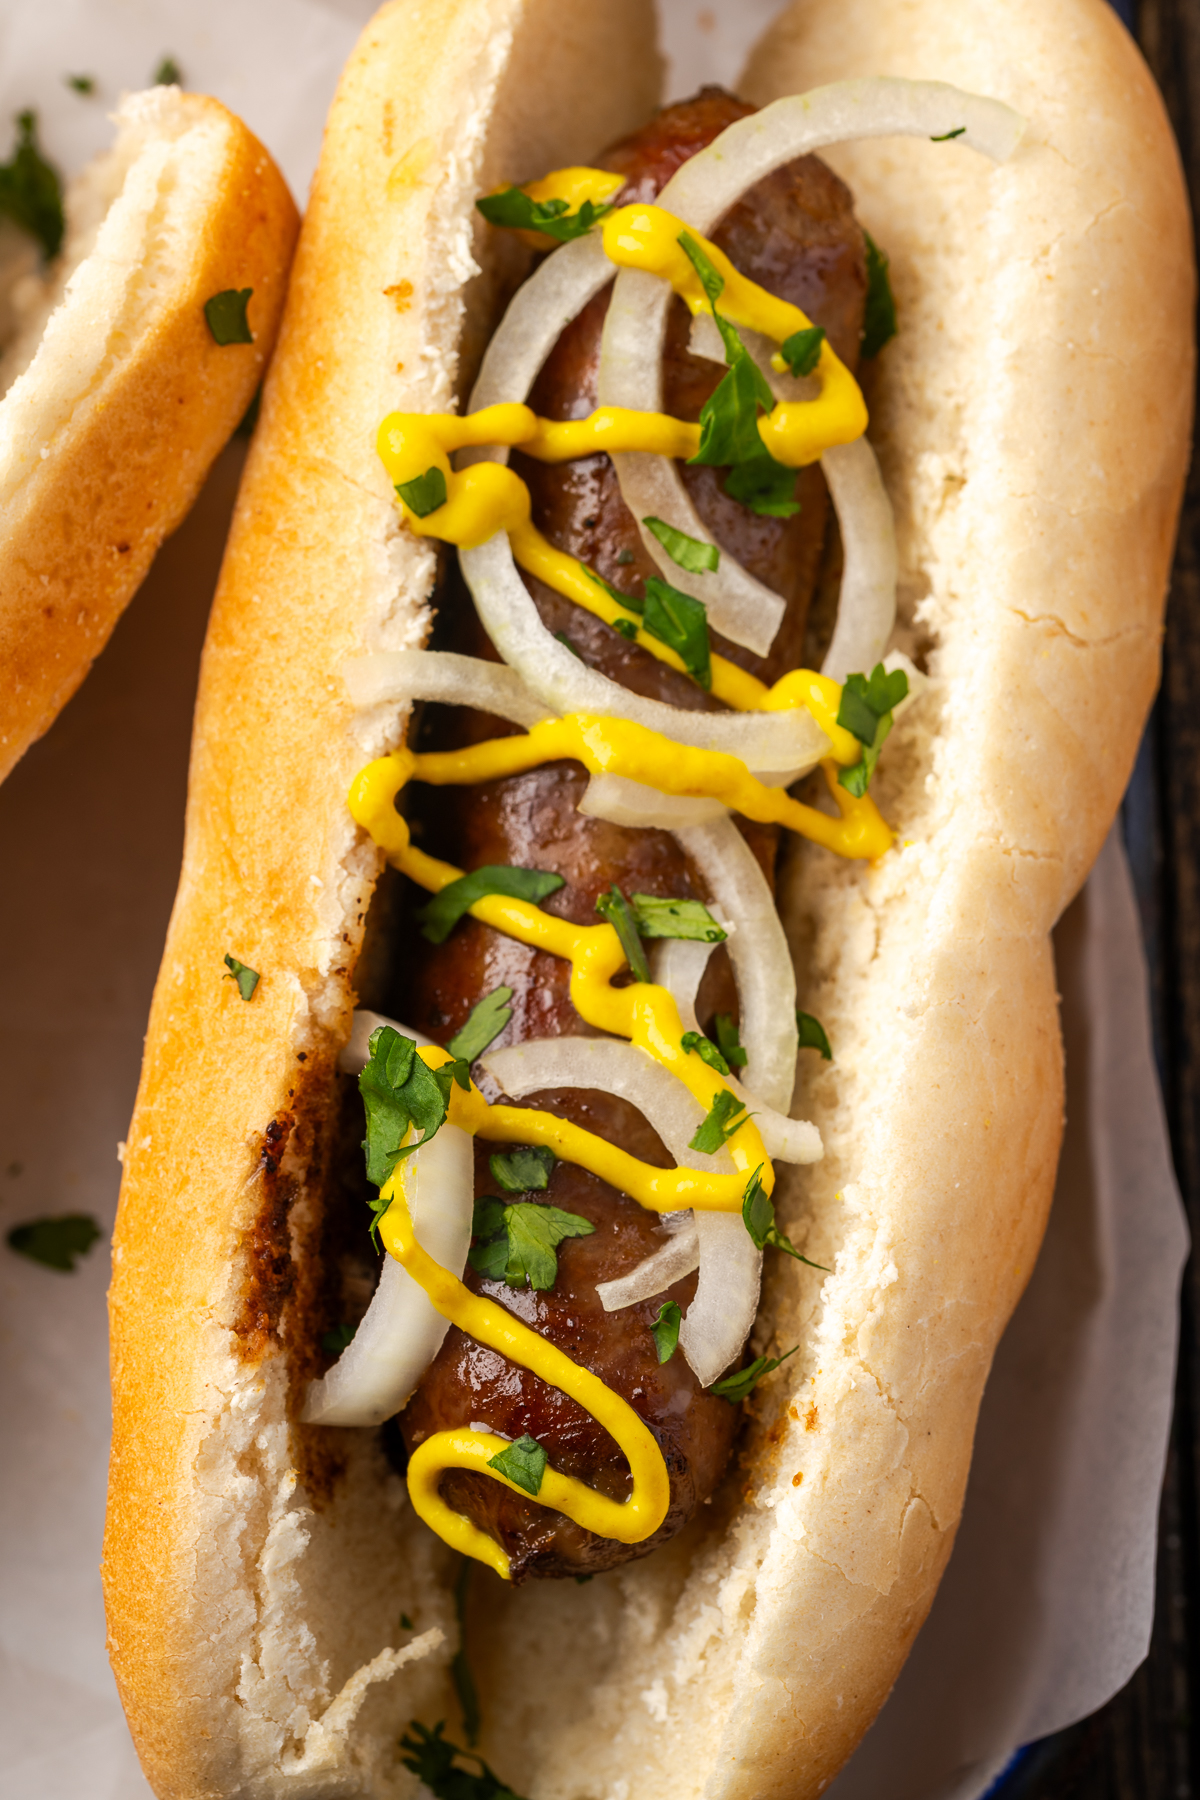
Made with cheddar bacon brats, sweet onions and peppers, and a dark hoppy beer, this recipe is simple enough for an easy weeknight dinner, yet impressive enough for your next backyard party!
Looking for more hot dog-style recipes? Try these Sonoran Style Hotdogs, this Chili Cheese Dog Skillet Bake, or Skillet Beanie Weenies, next!
Why You’ll Love This Recipe
- Juicy Inside, Crispy Outside: Simmer these brats in a delicious beer bath, followed by a hot skillet sear, and you’re guaranteed a succulent inside, with a perfect crispy snap on the outside.
- A Grill-less Meal: No barbeque? No problem! When cooking beer brats on the stovetop, you can still lock in all that charred, backyard BBQ flavor—your trusty cast iron will do all the heavy lifting.
- Customizable with Little Fuss: Very easy to swap out the beer, the toppings, or even the method of cooking, with minimal prep, and create a juicy, hearty meal at your next gathering.
Ingredients
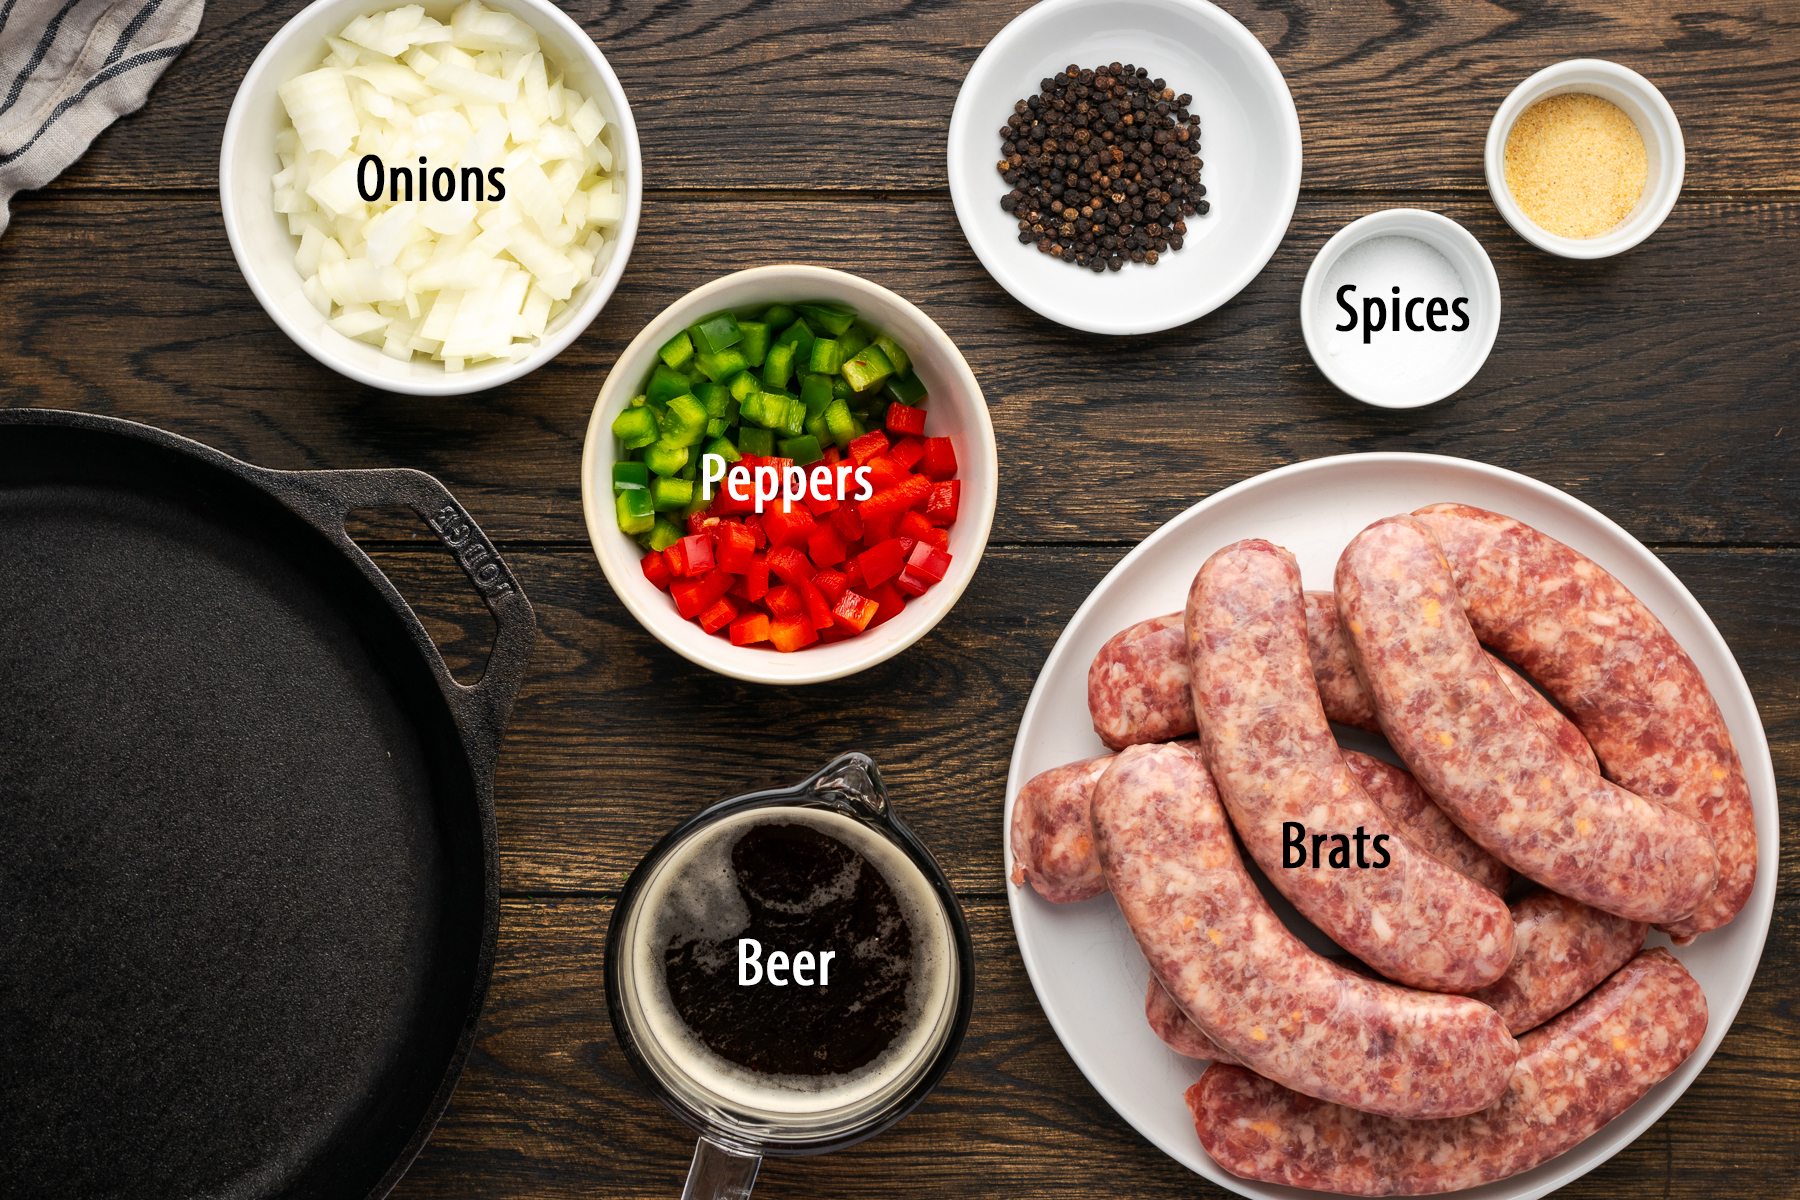
- Brats: The protein of the dish! For the best brats recipe, we’re using cheddar bacon brats for extra cheesy, meaty texture. Boiling the brats in the beer first creates a softer, more tender texture. Prefer a different flavor? Not a problem - any brat variety will work!
- Beer: A darker beer or ale can add rich, complex notes like roasted malt, chocolate or caramel. For a lighter version that’s not too overpowering, use a lager or pilsner instead. And, for bold, deep flavor, try a stout.
- Veggies: Boiling onions and peppers with the brats, a classic combo, with extra sweet and savory taste. Plus, the veggies double as a ready-made topping when it’s time to serve!
See the recipe card below for exact ingredient amounts, nutritional information, and detailed instructions.
Variations
- Extra Meaty: Wrap the brats in thin strips of bacon and secure with toothpicks before searing for an even smokier, crispier bite.
- For Sauerkraut Lovers: Calling all sauerkraut lovers! Simmer some directly in the beer with the brats and pile it on when serving.
- Non-Alcoholic: Instead of beer, simmer them in apple cider for a slightly sweeter, alcohol-free version that doesn’t compromise on flavor.
How to Cook Brats in Beer
Ready to fire up the skillet and bring the best bratwurst recipe to your stovetop? Grab your Dutch oven or skillet, pop that beer for boiling, gather the other ingredients and let’s get started!

- Step 1: Add the Veggies. Place the beer, garlic, salt, onions, peppers, and peppercorns in your skillet. Bring to a boil.

- Step 2: Add the Brats. Nestle the bratwurst down into the liquid and veggies.
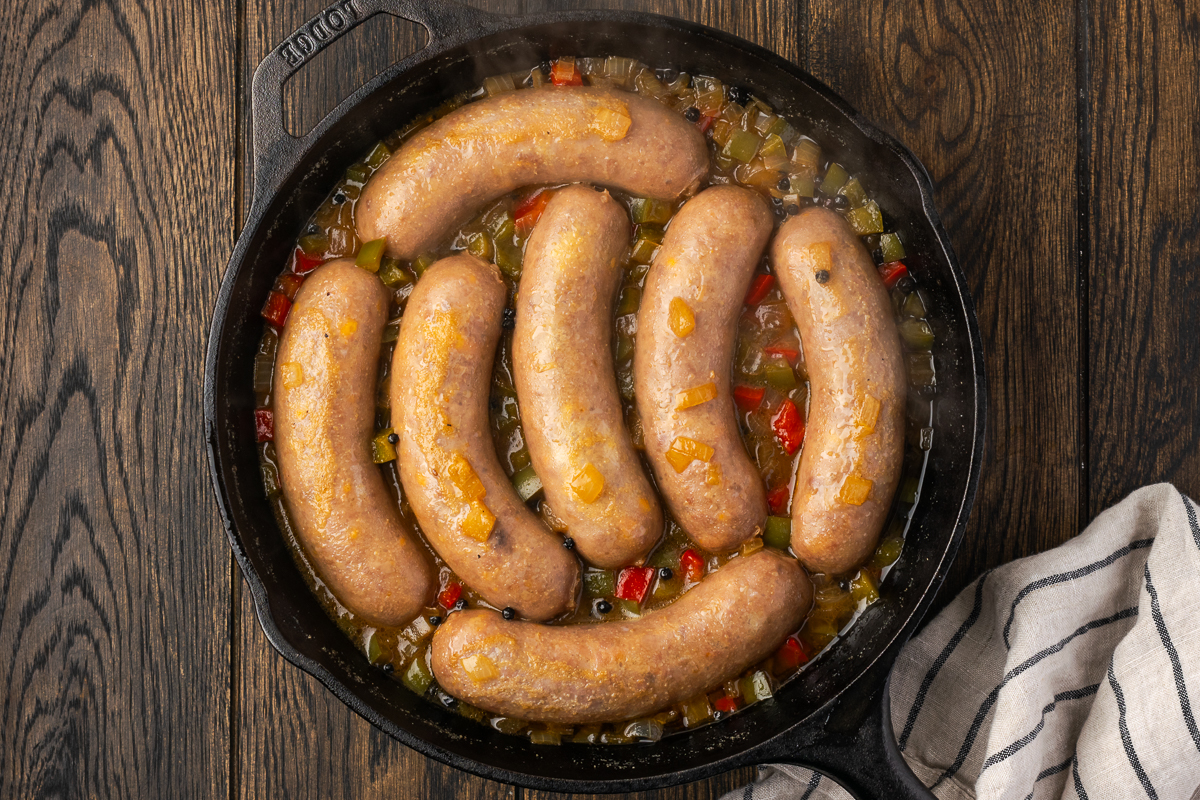
- Step 3: Boil the Brats. Return the skillet to a boil and then reduce to a simmer for 30 minutes. Once cooked, remove the brats, reserve ¼ cup of the beer mixture, and discard the rest.
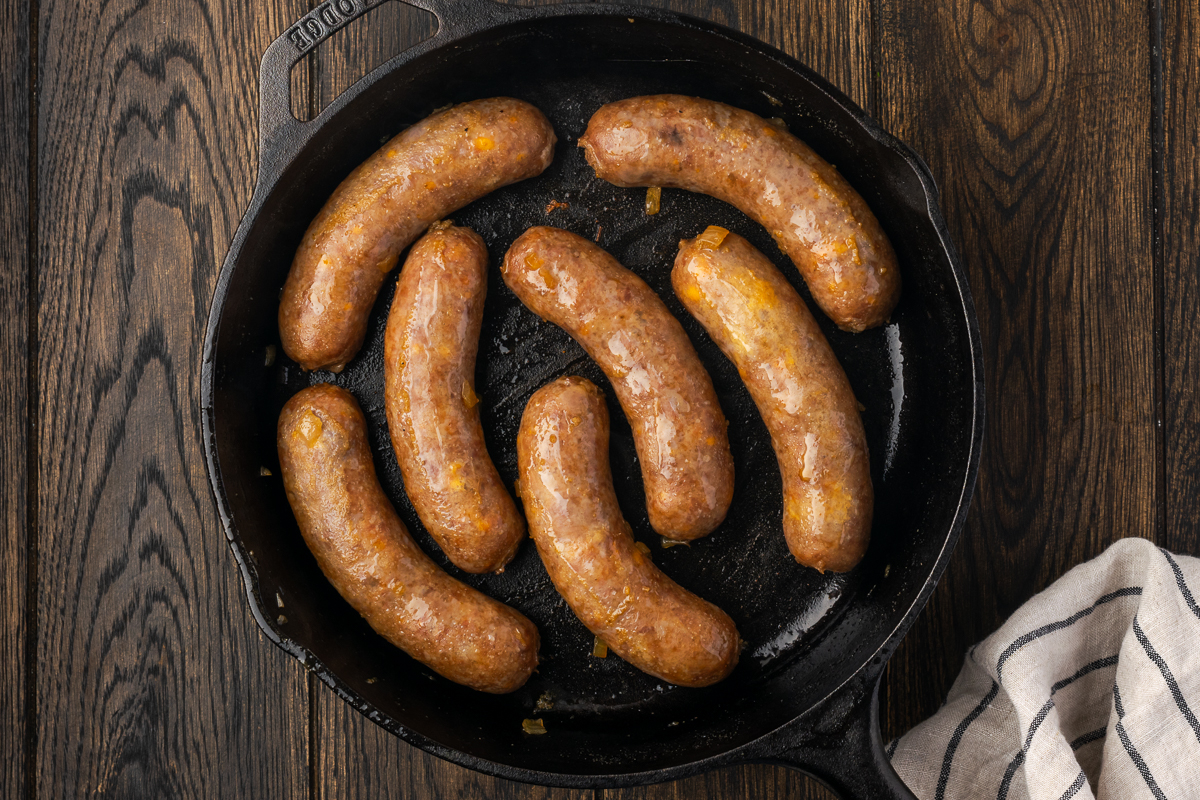
- Step 4: Return to Skillet. Return the brats to the skillet over medium-high heat and sear on all sides until golden brown. Gradually pour in the reserved liquid, allowing it to reduce slightly as you sear.

- Step 5: Serve. Take the pan off the heat and serve in buns, topped with your favorite condiments.
⭐️ Hint: For easy cleanup, drain the beer after simmering and use the same pan for searing.
Storage Tips
- Storing: Once cooled, store the brats in an airtight container in the fridge for up to 4 days. For longer storage, wrap them tightly in foil or plastic wrap, place in a freezer-safe bag, and freeze for up to 2 months.
- Reheating: Once thawed, reheat in the oven at 350°F, on a baking sheet, loosely covered with foil, for about 10-15 minutes until warmed through. Alternatively, reheat in a covered pan over medium-low heat, for about 5-7 minutes, flipping once or twice. If using a microwave, cover with a damp towel and heat in short bursts for 30-45 seconds until warmed through.
Serving Suggestions
This beer and brats dish is juicy, filling, and deserves more than just a bun! Whether you're keeping it classic or getting creative, these brats are easy to build a meal around. Here are a few tasty ways to serve them up:
- Pair with timeless sides like this easy coleslaw or Southern creamed corn for a no-fuss meal.
- Skip the bun and slice the brats over mashed potatoes, pasta, or veggie sides like roasted asparagus, cheesy Hasselback potatoes, or corn on the cob.
- Planning a game day feast? Serve with bacon wrapped pickles and roasted red pepper dip.

Expert Tips
- Soak and Simmer First: Boiling the brats first in a beer and seasoning mixture fully cooks and infuses them. In this beer brats recipe, simmering them first is key to a delicious brat, so don’t skip this step!
- Rest Before Serving: After searing, remove them from the pan and let the brats rest for 3-5 minutes to allow them to lock in all those succulent flavors.
- Brat Doneness: Look for an internal temperature of at least 160°F, and deep brown grill marks. Some slight pinkness inside is ok, as long as the internal temperature is correct.
Recipe FAQs
No, do not poke holes in the casing before cooking, as this could dry them out.
A casing can burst here or there and most likely this means your grill temperature is too high. Since the brats are mostly cooked during the boiling process, searing is just for browning - so keep the temp at medium-high heat or below when finishing them in the cast iron.
In this case, look for a brat that feels firm and springs back when gently pressed. Clear juices when pierced with a skewer or a fork is also a good sign they are ready.
While a cast iron is highly recommended, after the boiling process, feel free to swap the pan for the air fryer. The air fryer can be much quicker than the stove, so make sure to keep an eye on them and check every couple of minutes to prevent burning or bursting.
We are all about the cast iron, but that doesn't mean we can't use other methods of cooking, especially if time is an issue. Toss the braising liquid ingredients in your slow cooker then the brats. Give them a good stir, cover, and cook for 3 hours on high or up to 6 hours on low. You can drain and serve at that point, but if you've got the time, pull out a skillet and give them that quick sear in your cast iron skillet. You won't regret it!
More Mouthwatering Sandwich Recipes


If you tried these Cast Iron Beer Brats or any other recipe on my blog, please leave a 🌟 star rating and let me know how it went in the 📝 comments below. Thanks for visiting!
Get the Recipe

Cast Iron Skillet Beer Brats
Equipment
- 4 qt. Dutch Oven
- 12-inch cast iron skillet
Ingredients
- 8 cheddar bacon bratwursts
- 1 teaspoon granulated garlic 1 tablespoon fresh/ minced
- 4 oz yellow onion diced
- 4 oz bell pepper diced
- 24 oz dark ale/beer
- 1 teaspoon salt
- 1 tablespoon whole peppercorns
Optional items for serving
- 8 bratwurst buns
- 8 oz onions thinly sliced or diced
- ¼ cup yellow mustard
- ¼ cup cilantro chopped
Instructions
- Add the beer, garlic, salt, onion, and whole peppercorns to a Dutch oven (or skillet); bring to a boil.
- Add the bratwursts to the skillet.
- Bring to a boil then cover and cook for 30 minutes.
- Once done, reserving ¼ cup of the liquid, drain the rest; discard.
- Heat the skillet over medium high heat. (see notes)
- Sear the brats, (in batches if necessary, do not crowd them) on all sides to a deep golden brown, slowly incorporating the reserved liquid.
- Remove from heat.
Options for Serving
- Serve in a bun topped with onions, cilantro, and yellow mustard, or your favorite side dishes.
Notes
- Any Dutch oven, 3 quarts or larger will work. If using a Dutch oven, drain off and out all the braising liquid and sear the brats in the same pot instead of a separate skillet.
- A 12-inch skillet with a lid can be used to make the recipe instead of a Dutch oven.
- Boil the brats in beer with onions and peppers first to lock in flavor and keep them juicy.
- Let the brats rest for a few minutes after searing so they stay juicy and tender when sliced or served.
Nutrition
Dutch Oven Daddy is not a dietician or nutritionist, and any nutritional information shared is only an estimate. We recommend running the ingredients through an online nutritional calculator if you need to verify any information.
D says
I am not a connoisseur of brats, but these are very good.
Holly says
These brats were SO good! I had the kids over for the weekend so we were cooking for a crowd. This recipe was perfect. Everyone loved them Thanks for sharing.
Kate says
We loved all the flavors in these brats. Layers of tastiness on them!
Julia says
This was delicious, we used regular bratwursts as this was the inly thing we had but next time definitely trying the cheddar brats!
Anjali says
We made these brats for a block party this afternoon and they were a total hit!! The beer and spices added such great flavor to them!
Cathleen says
These were the ideal thing to make tonight!! My husband devoured these, and has already requested that I make it again. Thank you so much for sharing this recipe 🙂
Ava M says
The combination of savory bacon, rich cheddar, and flavorful beer takes these brats to a whole new level! This recipe is a keeper!
Jen says
Such a great idea to use cast iron!! It is so good!
Katherine says
This is such a great way to make brats extra special.
Tara says
Ooooh, the bratwurst looks so good! I absolutely love the combination of cheddar and bacon. Such a fantastic meal.
Janessa says
Wow, these look so delicious! Saving this recipe for camping this summer.
Dannii says
These look incredible, and they would be perfect for game day.
Cami says
So good!