
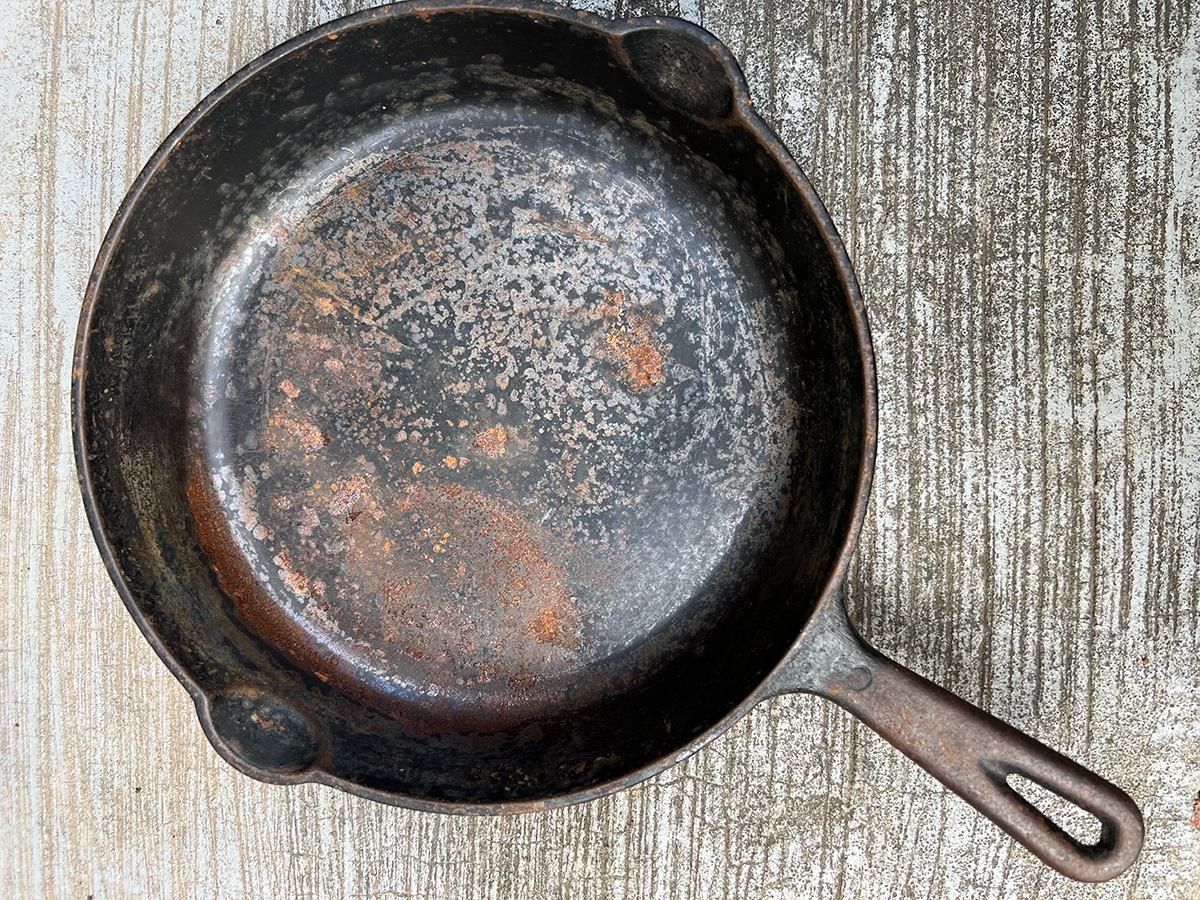
Building a cast iron electrolysis tank is the single best investment you can make if you collect, restore, or inherit old cast iron cookware. In about 30 minutes of setup and a day of hands-off soaking, your rustiest yard sale find comes out clean to the bare metal.
If you have ever spent an afternoon scrubbing rust off a skillet by hand, you know how tedious that process can be. A vinegar soak works for light surface rust, but for heavily corroded cast iron, an e-tank does the hard work for you while you go about your day. This guide covers everything: the science behind the process, the materials you need, step-by-step build instructions, safety considerations, and troubleshooting tips pulled from real questions readers have sent in over the years.
Jump to:
- Quick Look at this Guide
- Why Removing Rust from Cast Iron Matters
- How Electrolysis Actually Works
- Supplies Needed for Your E-Tank
- How to Build and Use Your E-Tank
- Safety Tips for Your E-Tank
- Troubleshooting Common E-Tank Problems
- Choosing the Right Anode Material
- Maintaining Your Restored Cast Iron
- Common Mistakes to Avoid
- Cast Iron Electrolysis Tank FAQs
- Start Restoring Your Cast Iron
Quick Look at this Guide
- ✅ What You'll Build: A DIY electrolysis tank for cast iron rust removal
- 🕒 Build Time: ~30 minutes setup (plus 24-48 hours soak time)
- 💰 Estimated Cost: $30-$50 if buying all new materials
- 🔧 Skill Level: Beginner-friendly
- ⭐ Why It Works: Electrical current converts hard rust to soft residue you can wipe away
Why Removing Rust from Cast Iron Matters
- Better Cooking Performance: Rust and built-up residue interfere with the cooking surface, causing uneven heating and off-flavors. A clean, properly seasoned pan distributes heat evenly and lets food release without sticking.
- Vintage Quality You Can't Buy New: Old cast iron from makers like Griswold, Wagner, and early Lodge was machined to a smoother finish than most modern production pans. Restoring a vintage piece gives you a cooking surface that new pans simply can't match.
- Built to Last Generations: Cast iron is one of the few pieces of kitchen equipment that can outlast the people who use it. A little restoration work now means your grandkids will still be cooking on the same pan decades from now.
- Foundation for Great Seasoning: Rust prevents seasoning oil from bonding to the iron. Stripping a pan down to bare metal with electrolysis gives you the cleanest possible starting point for building a durable, non-stick seasoning layer.
How Electrolysis Actually Works
Here is the short version of what is actually happening in that murky tank water. Electrolysis uses low-voltage DC current flowing through a water and washing soda solution to break down rust at a chemical level. The current converts hard, red rust (ferric oxide) into soft, black residue (ferrous oxide) that you can wipe off with your finger or a brush.
The rust migrates from the negatively charged cast iron to the positively charged sacrificial metal in the tank. That is why the scrap steel gets coated with gunk over time while the cast iron comes out clean. Technically, this process is rust reduction rather than rust removal: it reduces hard rust into a softer form you can then scrub away easily.
Understanding this process matters for two practical reasons. First, electrolysis is a line-of-sight process: the side of your pan facing the anode cleans first, so you may need to rotate the piece halfway through. Second, the process only works on rust and crud. It will not damage the underlying iron, which is why collectors trust it with irreplaceable antique pieces.

Supplies Needed for Your E-Tank
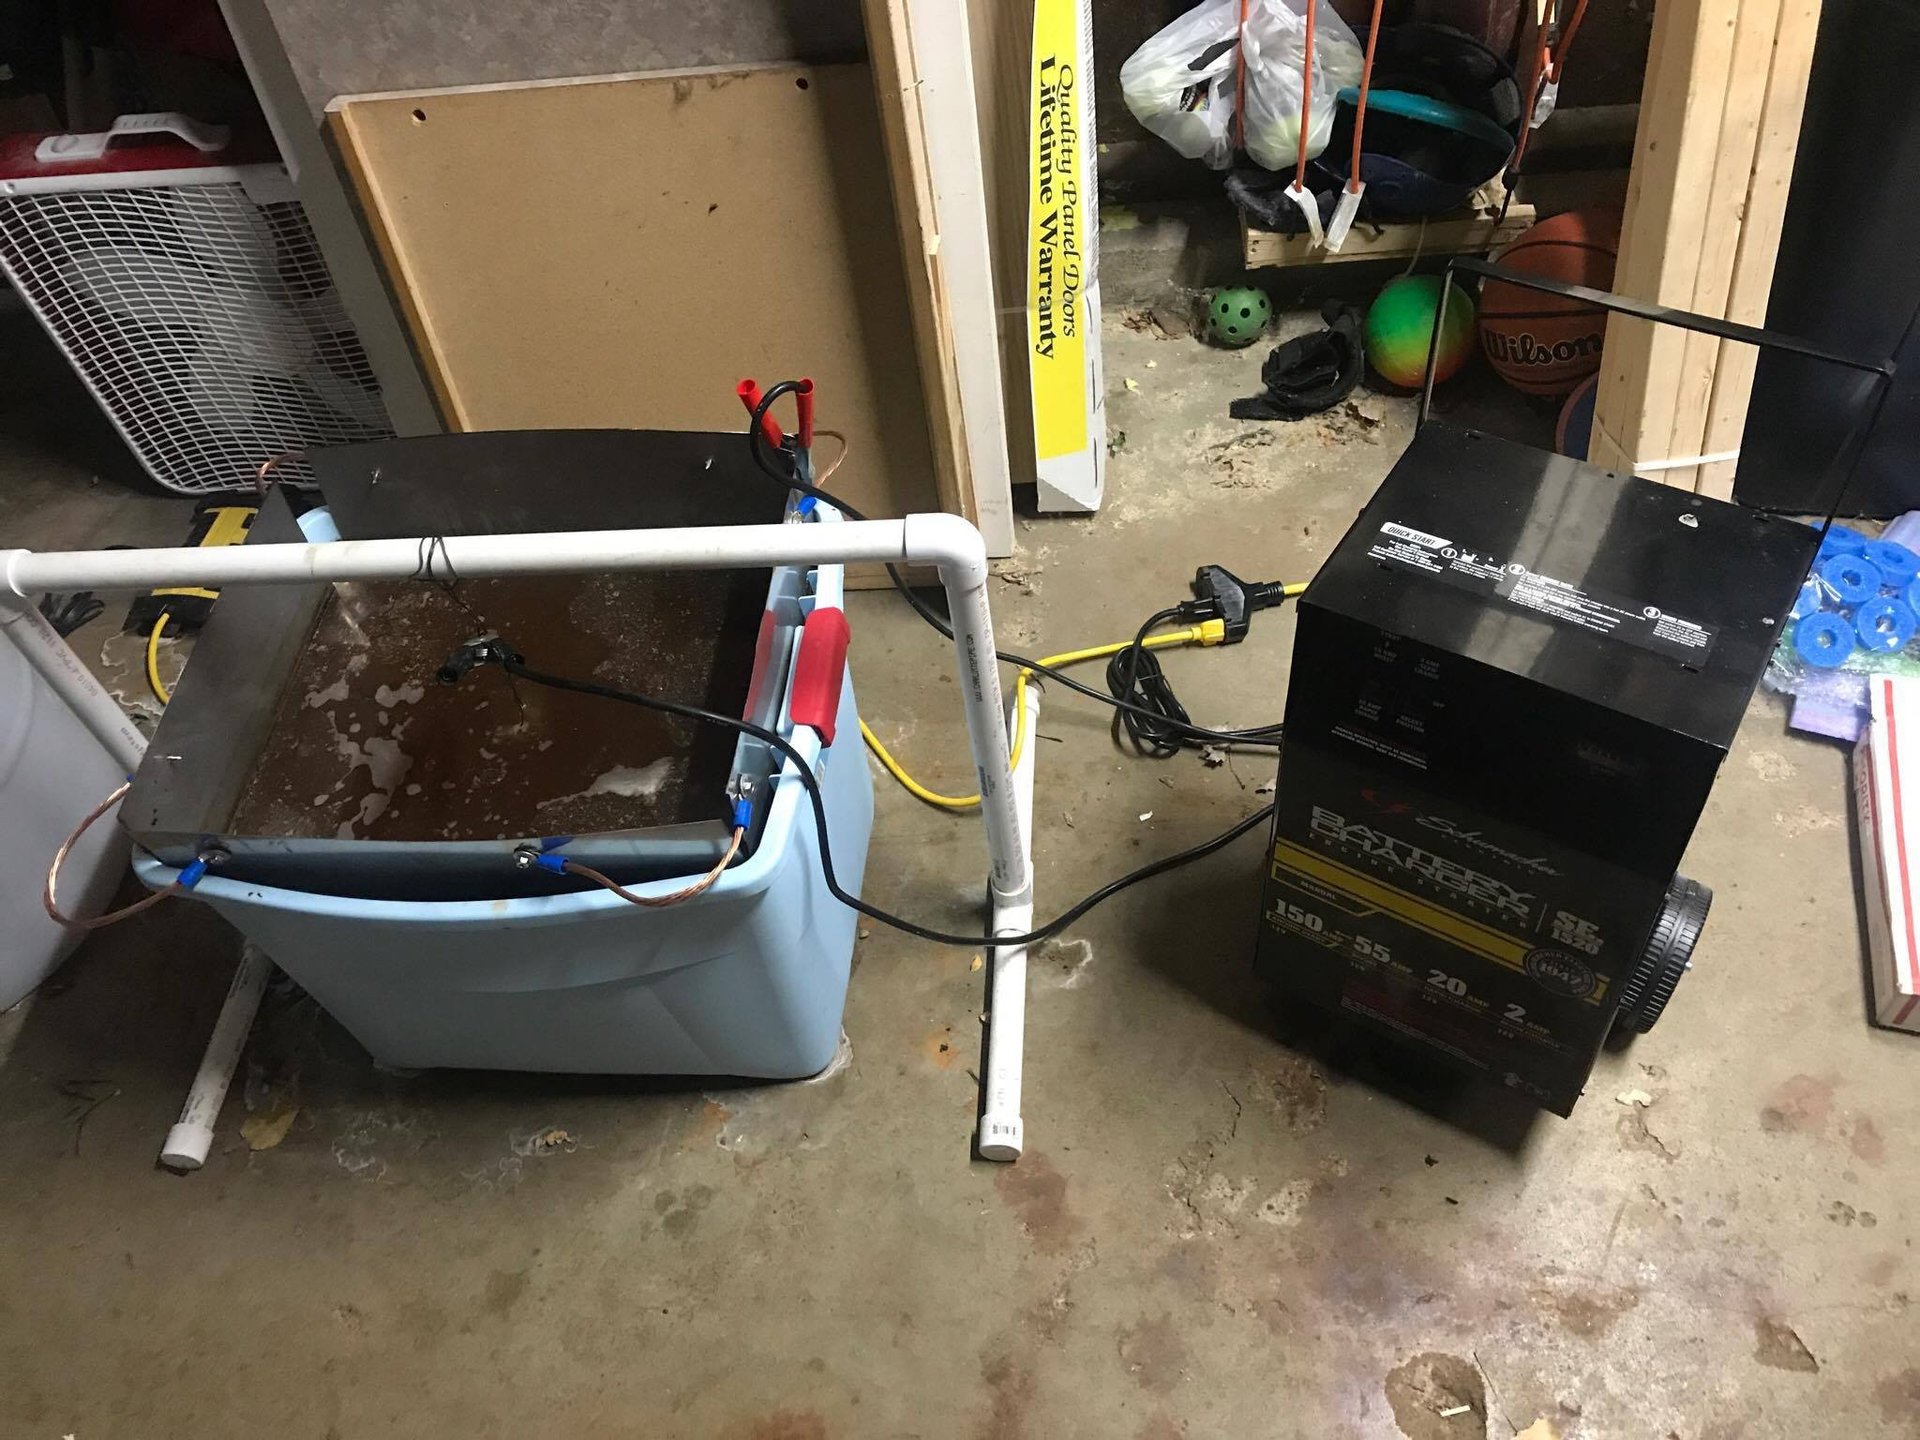
- Plastic Container: An 18-22 gallon Rubbermaid-style tote works well for skillets and most Dutch ovens. For larger pieces like cauldrons or wash kettles, a 30-gallon plastic trash can is a better fit. The container must be plastic (non-conductive) and sturdy enough to hold the weight of water plus your cast iron.
- Sacrificial Anodes: Plain carbon steel only. Good sources include rebar, old lawn mower blades, angle iron, or sheet metal scraps from an HVAC shop. More surface area means faster cleaning. Never use stainless steel (it can produce hexavalent chromium, a known carcinogen) and never use galvanized steel (the zinc coating releases harmful compounds).
- Manual Battery Charger: A 2-10 amp manual charger is ideal. You must use a manual charger because automatic chargers detect the tank as a "fully charged battery" and shut themselves off. If manual chargers are hard to find in your area, a variable DC power supply (used for electronics testing) is a reliable alternative.
- Washing Soda (Sodium Carbonate): Look for Arm & Hammer Super Washing Soda in the yellow box in the laundry aisle. This is NOT baking soda (sodium bicarbonate). Use ½ cup per 5 gallons of water. Do not add extra: too much washing soda causes excessive current and can overheat the charger.
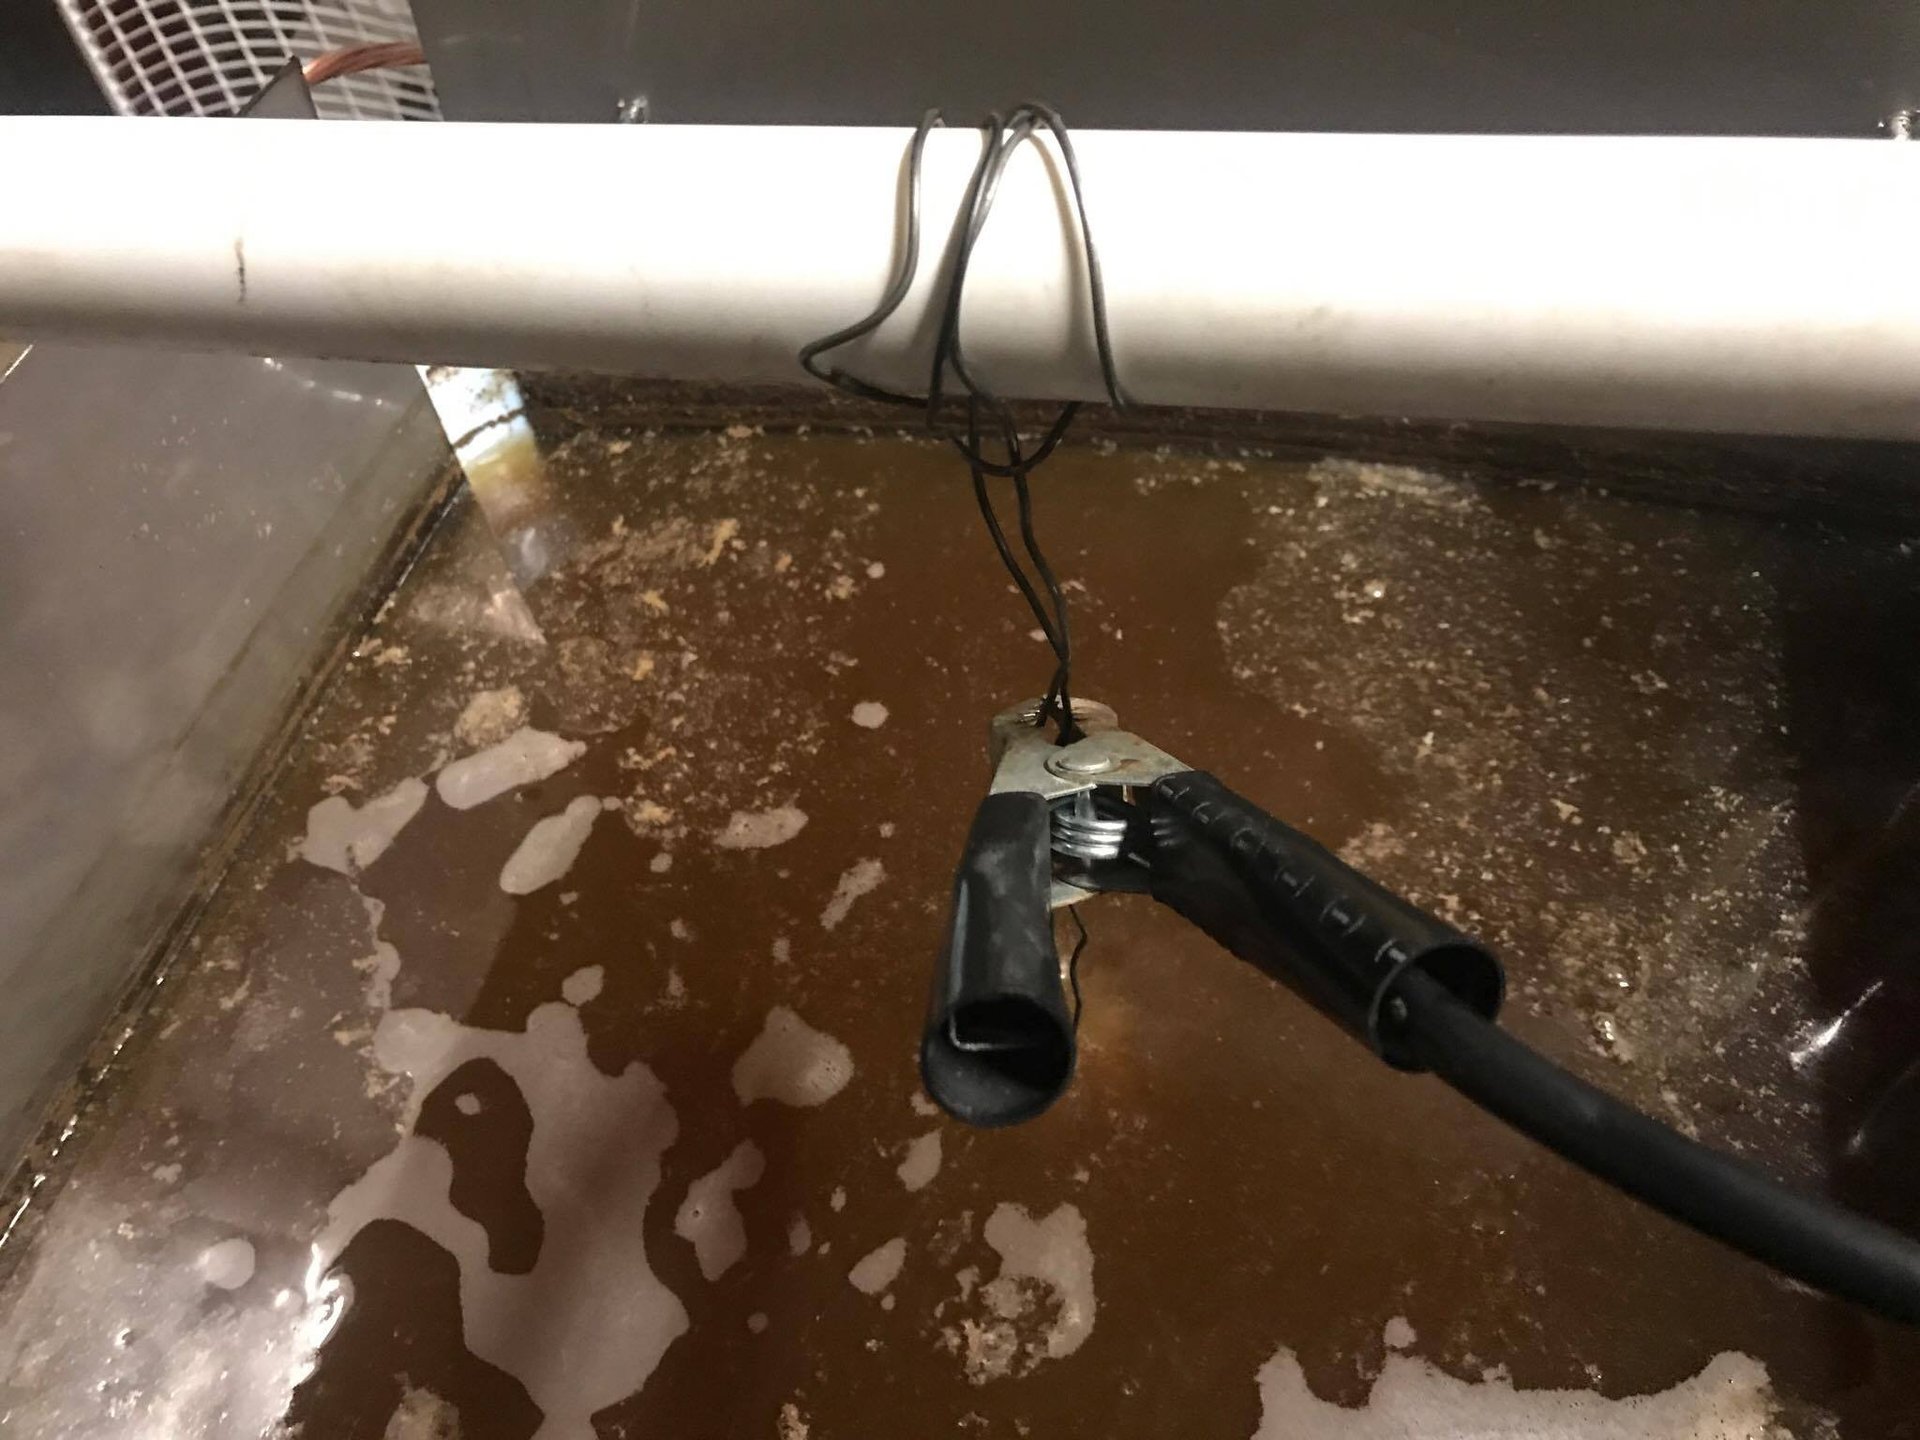
- Wire for Connections: Steel wire (rebar tie wire works great) for connecting your anodes together and for hanging the cast iron. Copper wire can be used above the waterline for connections, but keep it out of the solution because submerged copper can corrode onto the iron.
- PVC Pipe or 2x4: Serves as a crossbar spanning the top of the container, providing a sturdy support to hang the cast iron from wire.
- Coat Hanger or Rebar Tie Wire: Bent into a hook shape to suspend the cast iron piece inside the tank during the cleaning process.
How to Build and Use Your E-Tank
The most effective way to treat heavily rusted cast iron is by building a cast iron electrolysis tank. In about 30 minutes of setup and 24-48 hours of soaking, your cookware will be ready for an easy scrub and a fresh coat of seasoning.
- Step 1: Choose Your Location. Set up in a garage with the door open or outdoors. Electrolysis produces small amounts of hydrogen gas, which is flammable. Never place your tank near a pilot light, water heater, grill, or any open flame. Good ventilation is essential.
- Step 2: Prepare the Container and Anodes. Place the anode (scrap steel) inside the plastic container along one wall. Secure it with zip ties, clamps, or screws. If using multiple anodes, connect them together with steel wire. Then fill the container with water, leaving a few inches of headroom.
- Step 3: Mix the Electrolyte Solution. Add washing soda to the water (½ cup per 5 gallons) and stir until fully dissolved. This turns the water into an electrolyte that conducts the current between the anode and your cast iron.
- Step 4: Suspend the Cast Iron. Position the PVC pipe or 2x4 across the top of the container. Use a bent coat hanger or rebar tie wire to hang the cast iron from the crossbar. The piece should be fully submerged but NOT touching the anode. Direct contact will cause a short circuit.
- Step 5: Connect the Battery Charger. Attach the BLACK (negative) clamp to the cast iron or the wire holding it. Attach the RED (positive) clamp to the anode. A simple way to remember: "blacK goes on the sKillet." Connecting these backward will make your cast iron rust worse instead of better.
- Step 6: Turn On and Wait. Set the charger to 2 amps (lowest manual setting) and turn it on. Within a few minutes, you should see fine bubbles forming around the cast iron. That means current is flowing and the process is working. Let it run for 24 hours. For heavy rust, let it go a full 48 hours.
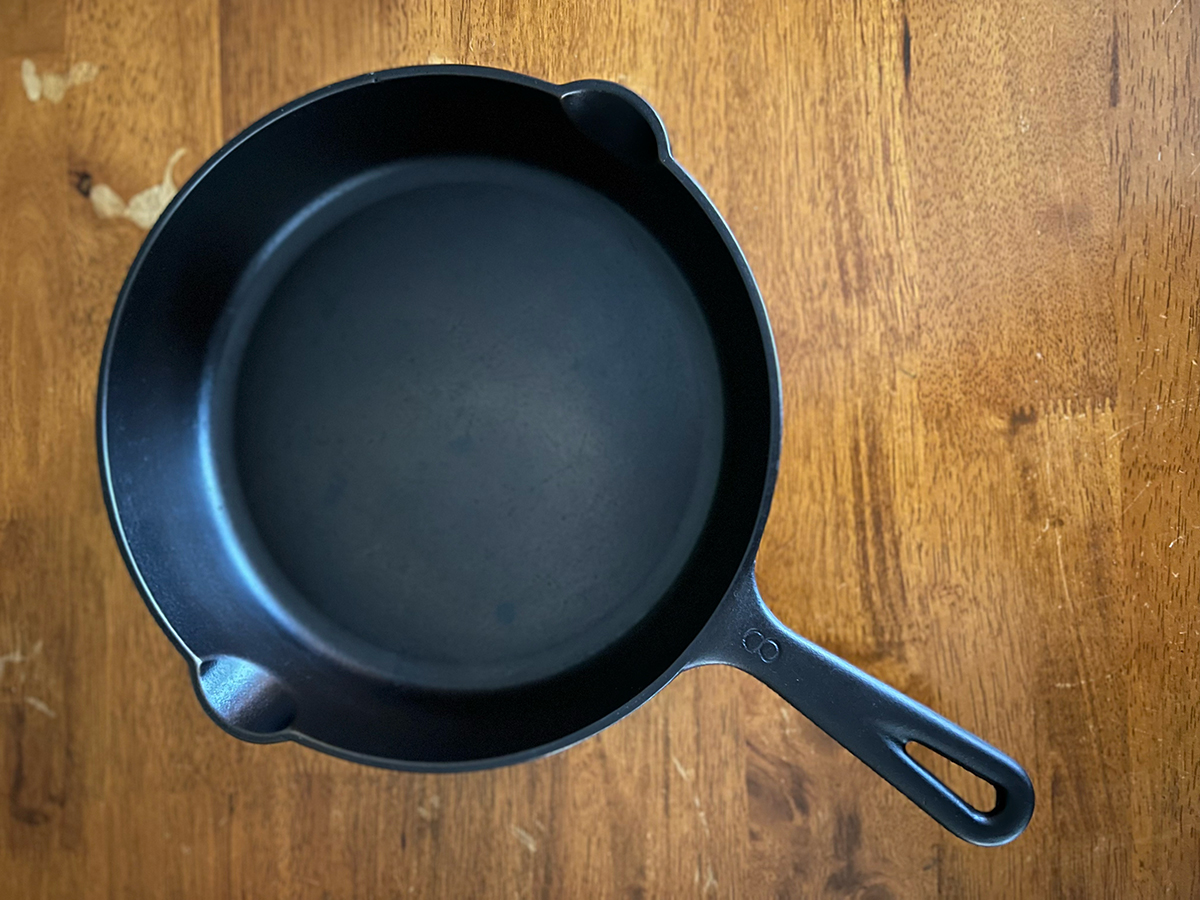
- Step 7: Remove, Scrub, and Season. Always unplug the charger before reaching into the tank. Remove the cast iron and scrub it under warm water with a stiff brush or steel wool. The black residue should wipe away easily. Dry the piece immediately (bare iron rusts within minutes of air exposure), then season your cast iron right away to protect the bare metal.
Safety Tips for Your E-Tank
- Always Unplug Before Touching the Water. The 12-volt DC current from a battery charger is unlikely to hurt you, but you do not want to risk the charger falling into the tank while your hands are in the water. Unplug it every time.
- Never Use Stainless Steel Anodes. The chromium in stainless steel can oxidize during electrolysis and produce hexavalent chromium ("hex chrome"), a known carcinogen. Plain carbon steel or graphite plates are the only safe choices.
- Never Use Galvanized Steel Anodes. The zinc coating on galvanized steel can release harmful compounds into the electrolyte solution. Even at low voltages, it is not worth the risk.
- Ventilate Your Workspace. Electrolysis produces hydrogen gas, which is flammable in enclosed spaces. An open garage or outdoor location with good airflow is ideal. Never set up next to a pilot light or ignition source.
- Wear Rubber Gloves. The washing soda solution is not toxic, but it is alkaline and can irritate skin with prolonged contact. Gloves also keep your hands cleaner when handling rust-coated pieces.
Troubleshooting Common E-Tank Problems
Over the years, I have received a lot of great questions from readers who have built their own e-tanks. Here are the most common issues and how to fix them.
- Battery Charger Keeps Tripping or Shutting Off: Turn the amperage down to 2 amps. If you added too much washing soda, the solution may be too conductive, pulling more current than the charger can handle. Try diluting with more water. Also check whether your anode has become heavily corroded; a degraded anode increases resistance and can cause charger issues.
- No Bubbles Forming: Check your connections. The clamps need clean metal-to-metal contact. Use a wire brush or steel wool to scrub the rust off the spot where you are clamping onto the cast iron. Also confirm your charger is set to manual mode, not automatic.
- Rust Is Not Coming Off After 24 Hours: Remember that electrolysis is a line-of-sight process. The side of the pan facing the anode cleans first. Rotate the piece 180 degrees and run another session. Adding anodes on multiple sides of the tank also speeds things up significantly.
- The Water Looks Disgusting: That is completely normal. The solution works indefinitely regardless of how murky it gets. Just top off any evaporated water and add a proportional amount of washing soda. Replace the solution only when it becomes so thick with sludge that you cannot see the cast iron at all.
- Charger Clamps Getting Hot: This means poor electrical contact. Clean the connection points on both the cast iron and the anode. Hot clamps waste energy, can damage the charger leads over time, and reduce cleaning efficiency.
Choosing the Right Anode Material
Not all metals are created equal when it comes to e-tank anodes. Here is a quick breakdown of your options.
- Plain Carbon Steel (Recommended): Cheap, effective, and widely available. Rebar, old lawn mower blades, and HVAC sheet metal scraps are all great sources. The downside is that carbon steel corrodes over time and needs occasional scraping or replacement.
- Graphite Plates: A longer-lasting alternative that does not corrode like steel. Graphite is electrically conductive but far less reactive, so it does not get coated with iron oxide the way steel anodes do. It costs more upfront but saves time on maintenance. Store graphite anodes dry between uses.
- Stainless Steel (Avoid): While it lasts longer than carbon steel, the chromium in stainless can produce hexavalent chromium during electrolysis. This is a known carcinogen that requires hazardous waste disposal. Not worth the convenience trade-off in a home setup.
- Galvanized Steel (Never Use): The zinc coating releases harmful compounds into the electrolyte solution. Always check that your scrap metal does not have a shiny zinc coating before putting it in the tank.
Maintaining Your Restored Cast Iron
- Season Immediately: Bare cast iron rusts fast, sometimes within minutes of air exposure. After scrubbing your restored piece, towel-dry it thoroughly, place it in a warm oven to drive off remaining moisture, then apply a thin layer of seasoning oil while the iron is still warm. Check out this simple guide to seasoning cast iron for the full process. For a premium seasoning product, BuzzyWaxx cast iron seasoning is made specifically for this job.
- Washing Technique: To preserve the seasoning after cooking, clean your cast iron with warm water and a stiff brush while the pan is still warm. Avoid steel wool or wire wheels on seasoned surfaces because they can strip away the protective coating you just built up.
- Dry Storage: Store your cast iron in a dry location to prevent moisture exposure. If you are stacking pans, place a paper towel or cloth between them to protect the seasoned surfaces and allow air circulation.
- Pair with Oven Cleaner for Full Restoration: If your cast iron has both rust AND old, flaky seasoning buildup, use both methods. Stripping with oven cleaner removes old seasoning and crud, while the e-tank handles rust. Together they strip the piece down to bare metal for a fresh start.
Common Mistakes to Avoid
- Connecting the Leads Backward: If you attach the RED (positive) lead to your cast iron instead of the anode, the polarity is reversed and you will make the rust worse. The cast iron becomes the sacrificial piece. Remember: "blacK goes on the sKillet."
- Using an Automatic Battery Charger: Automatic chargers detect the tank as a "fully charged battery" and shut off. You need a manual charger with a physical amp setting switch. This is probably the most common reason beginners think their e-tank is not working.
- Neglecting to Dry Immediately: Bare cast iron rusts incredibly fast. Even a few minutes of sitting wet after removal from the tank can start new surface rust. Towel-dry immediately, then place the piece in a warm oven or over low stovetop heat to drive off all moisture before seasoning.
- Overcrowding the Tank: Each piece needs clear line of sight to the anode. If you pack multiple pieces in, they shadow each other and the sides facing inward will not clean. Treat one piece at a time for the best results.
- Using the Wrong Anode Metal: Stainless steel and galvanized steel are both hazardous in an e-tank. Stick to plain carbon steel or graphite. If you are using scrap metal, check for a shiny zinc coating (galvanized) before tossing it in.
Cast Iron Electrolysis Tank FAQs
Electrolysis is safe for bare cast iron and steel cookware. However, never use it on aluminum (the aluminum will dissolve), enameled cast iron (the enamel coating can be compromised), or chrome/nickel-plated pieces unless the plating is already flaking off. Stick to bare, uncoated cast iron and you will get great results.
Yes, when done properly. The 12-volt DC current from a battery charger is very low voltage. The main safety considerations are ventilation (hydrogen gas is flammable in enclosed spaces), using the right anode materials (plain carbon steel or graphite only, never stainless or galvanized), and always unplugging the charger before reaching into the tank.
The red and brown rust will convert to a soft black residue that wipes off with your finger or a brush. When you scrub the piece under warm water and the surface is uniformly gray, bare metal with no remaining red rust, the process is complete. Some darker staining in heavily corroded spots is normal and will not affect performance after seasoning.
No. Baking soda (sodium bicarbonate) and washing soda (sodium carbonate) are different chemicals. Washing soda creates a much more effective electrolyte for conducting current through the water. Look for Arm and Hammer Super Washing Soda in the yellow box in the laundry aisle of your grocery store. It is not the same product as the baking soda in the orange box.
You are most likely using an automatic charger. Automatic chargers detect the e-tank as a fully charged battery and shut themselves off as a safety feature. You need a manual battery charger with a physical switch for 2, 6, or 10 amp settings. A variable DC power supply from an electronics store is another reliable option if manual chargers are hard to find.
The solution lasts indefinitely. It will turn dark and murky after a few uses, but that does not affect performance. Just top off any evaporated water and add a proportional amount of washing soda. Replace the solution completely only when it becomes too thick or sludgy to work effectively. If you used plain carbon steel anodes (as recommended), the used solution is non-toxic and can be disposed of on the ground away from gardens.
Start Restoring Your Cast Iron
I have restored dozens of pieces with this method, from $2 yard sale skillets to family heirlooms that had been sitting in a barn for 20 years. The e-tank handles all of them the same way: set it up, let it soak, scrub it off, and season it fresh. If you are looking for more cast iron care tips, I have a whole section of the site dedicated to keeping your cookware in top shape.
Have you built your own e-tank? I would love to hear how it turned out. Drop a comment below with your setup or any questions you have along the way.


Nell says
Hello and Thanks for allowing me here.
This is my first tank ever never seen one built never seen one in use before and it seems to be very scary.
I have bought a 40 gallon plastic barrel with a lead that fits it properly. I have bought connecting valve for the bottom to drain out the liquid so that it can be emptied easily. I have also bought a heater that some people use for chicken waters to keep them from freezing during the winter time, I have not yet started to put this together due to coming down sick with the Covid. So as soon as that’s over with I will get started. I’m understanding that I am to use a heavy wire, such as a coat hanger wire or copper wire to attach the Skillet to the board OK to submerge it in the liquid. I bought a converter from 1:10 to 12 V instead of a battery charger and I’m hoping this will be fine to use. It was recommended through another website so I ordered it was not that expensive. I have purchased about 35 rusty skillets that needs to be cleaned. Some are have crud some just rust now if I need to just remove the crud I can use that in a lye tank or if it’s rust and crud I should use that in the etank. Thanks for any advice and any help that you can give me putting my etank together.
Ned Adams says
You got this! The best thing is that it is low voltage. I think you are on the right track with what you mentioned.
Cecil Spivey says
After years of wanting to do it, I have just built my e-tank and begun to use it. It’s working amazingly well! Just one question for the expert… I’m using a piece of 10 gauge Cooper wire to hang my cast iron piece in the tank. Is there any problem with that? I know only a tiny bit about unlike metals and galvanic corrosion, and I’m wondering if I’m introducing a problem. Please let me know your thoughts about this. Thanks!
Ned Adams says
Great question, you could do that, however I typically just use a wire coat hanger since it’s generally cheaper than copper wire.
David Carley says
I built it as you described and the first time it worked like a dream!! But the second time my power supply keeps tripping like it is shorting out. I am not sure what I am doing wrong. The pan isnt touching the steel sheets, there is no short anywhere. Is it something to do with the resistance the liquid solution is presenting? The only thing I did differently was I diluted the washing soda in hot water first.
Ned Adams says
Great question, David. I've seen the same thing from time to time. What I'll do is turn the power amperage down. 2amps should work great. I've also noticed that over time the steel will start to get chewed up, so I have to replace that. I also don't dilute the washing soda in hot water first. You could also try using less washing soda and see if that helps. Over all it sounds like the battery charger might be pulling higher amount of power than it needs. Hopefully that gives you some ideas and things to check. Hope you have a great day!
Becky Stewart says
Mr. Adams, are you on Facebook. May I ask where you are located? Thanks so much.
Ned Adams says
You can find me on Facebook via the following URL, or there’s a link to this url at the top of my website. https://www.facebook.com/dutchovendaddy
Josh Pisani says
What amperage is the charger set at?
Ned Adams says
I use mine on 2 amps.
Todd Delquadri says
What setting are you using on the charger?
Ned Adams says
Hi Todd. I use mine on 2 amps.
Chris Gilleland says
Can you completely submerge the handle of the cast iron skillet being cleaned where the coat hanger attaches to the handle or does it need to be out of the solution a little? Most of the pics I’ve seen show the tip of the handle out of solution a little. Just wanting a uniform clean. Thank you
Ned Adams says
Since it is very low voltage, you can submerge the handle completely.
Christopher granata says
Hey can you send me more detailed pics on the build.I have an absolute treasure trove of antique cast iron that needs restoring
Michelle De La Cerda Nash says
There are pretty detailed step by step images in the post currently. If you have a particular question about a step, feel free to reach out again.